My First Try
Inside Panel
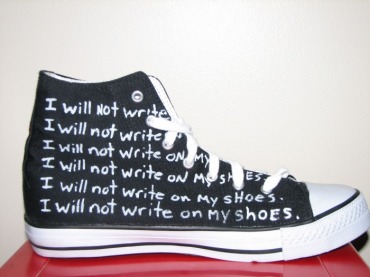
These are the very first pair of customs I did. I'm a teacher in real life and I thought the students would get a 'kick' out of a pair of teacher shoes. Well, they turned out so badly I never had the nerve to wear them. But they did show me that there was real potential in making custom shoes. The first trick I learned was that black is the hardest colour to use as a base. I used painty pens so I figured they would cover the black fairly easily. I was wrong. It took many layers to bring the colours up, much to my frustration.
But rest assured, things started to get better pretty quickly. Keep looking. See for yourself.
But rest assured, things started to get better pretty quickly. Keep looking. See for yourself.
Outside Panel
Second Try
Outside Panel
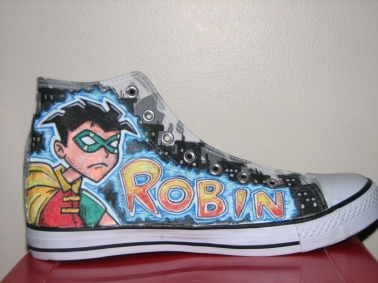
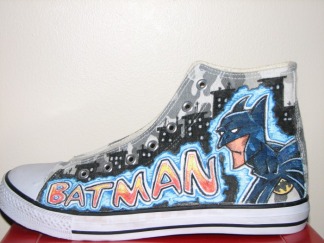
Next came a pair of Batman and Robin shoes, also on the cheapies. I never did finish these. There were going to be villains on the other side, but I wasn't big on the artwork.
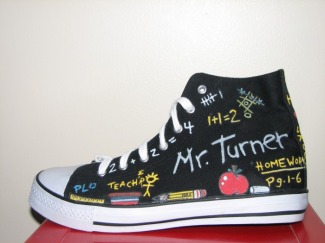
The important thing here is that I moved from black canvas to lighter (though this is a sort of cammo pattern and again, hard to colour over). Also, I used fabric pens for the first time. They were much better than painty pens in that the colour was rich and they blended nicely. The downside is that they tend to be fairly expensive and they don't last very long.
After these I made a pair of Star Trek shoes for my brother but I didn't get a picture of them. One of these days I'll go over to his place and snap a pic or two. If I ever remember.
Outside Panel
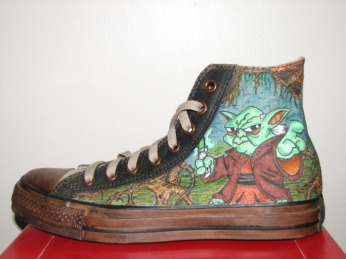
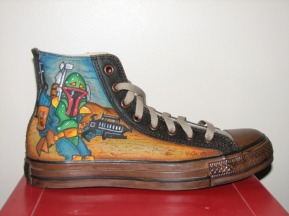
Star Wars Shoes
Left Outside Panel
Now things are starting to shape up a little. These are my Star Wars shoes. I bought these cool brown Chucks at some discount shoe store for $35 (half the regular price here in Canada) and agaonized for weeks - what to do, do I dare try to paint over a dark colou again, etc. Finally I just went for it and this is the final result.
The image side is, of course, Yoda (Jedi Master extraordinaire and bad-ass sabre swordsman) and Boba Fett (the most feared Bounty Hunter in the galaxy). I did them completely in fabric markers and I am very happy with the results. The inside is just random design done in fabric marker and painty pen. Not too bad, I guess. I just didn't know what else to put on the inside that incorporated the patches. In retrospect, I should have made the patches into Death Stars or something. Oh well. Next time.
The image side is, of course, Yoda (Jedi Master extraordinaire and bad-ass sabre swordsman) and Boba Fett (the most feared Bounty Hunter in the galaxy). I did them completely in fabric markers and I am very happy with the results. The inside is just random design done in fabric marker and painty pen. Not too bad, I guess. I just didn't know what else to put on the inside that incorporated the patches. In retrospect, I should have made the patches into Death Stars or something. Oh well. Next time.
Right Outside Panel
Left and Right Inside Panels
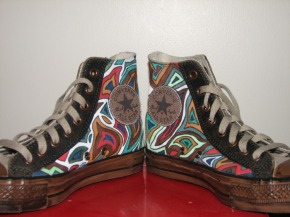
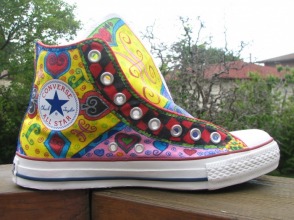
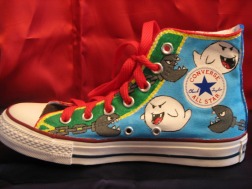
Cool Fish/Cool Frog
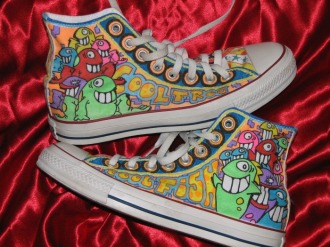
Outside Panels
These are my first try with white Converse and I have to say, they are one of my favourite pair. They're just a lot of fun, very colourful. I wore them to my teacher's college graduation and got a lot of compliments on them.
I used fabric markers only, which are very vibrant and remain so. But again, cost and durability are an issue.
I used fabric markers only, which are very vibrant and remain so. But again, cost and durability are an issue.

Inside Panels
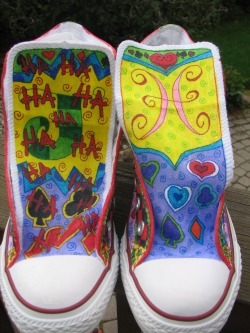
Bat Villains
Outside Panels
My second favourite pair so far. You may see a common thread running through these shoes. I'm also a HUGE Batman fan. These, obviously, depict Joker and Riddler.
I did these completely in fabric pens. Again - colours look great . . . bank account severely deflated. Now, when I say expensive, a set of five markers runs about $11. And of course, those five don't offer all the necessary colours, so it means buying a second set of alternate colours - another $11. And if you're lucky you get one full pair of shoes (all four sides and the tongue) out of them. But hey. When the end result is these bad boys, it's worth it.
I did these completely in fabric pens. Again - colours look great . . . bank account severely deflated. Now, when I say expensive, a set of five markers runs about $11. And of course, those five don't offer all the necessary colours, so it means buying a second set of alternate colours - another $11. And if you're lucky you get one full pair of shoes (all four sides and the tongue) out of them. But hey. When the end result is these bad boys, it's worth it.
Inside Panels
Batman Shoes
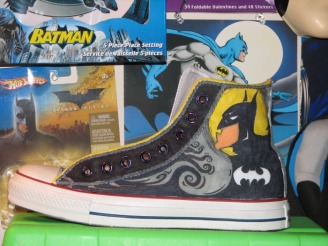
Outside Panel
Here's another pair of Batman Chucks done in Sharpies as opposed to fabric markers. These were meant to sort of be complimentary to the Villain shoes but they didn't really turn out the way I had hoped. I like the design, but the colours (or lack thereof) just don't pop. Not sure if it's the grim colour scheme or the Sharpies themselves. They're OK, but not the best I've done.
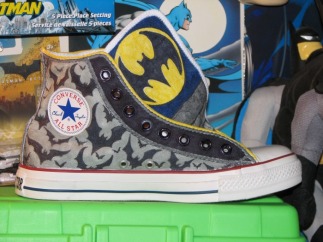
Inside Panel and Tongue
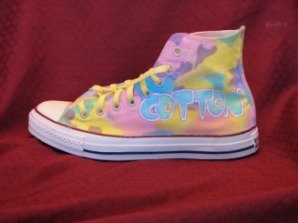
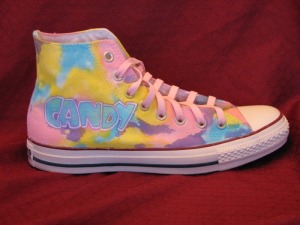
Cotton Candy
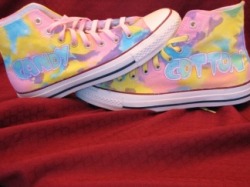
These are the first pair of 'commissioned' shoes I ever did. They were for a twelve year old girl who loved, as you may guess, cotton candy. These were experimental. I used regular acrylic paint for these, which worked surpringly well, actually. I soaked the shoes till they were saturated, mixed up a watery batch of pink, blue, purple, and yellow paint and just blotched it on. The watery shoes pulled the paint wherever it wanted to go and gave it a pretty decent tye-dye look. After they dried completely (a couple of days to be sure they were good and dry) I painted on the lettering with the same paint colours. I also gave them a little blast of clear acrylic top coat for added measure.
In the end they looked pretty cool and the kid was quite happy with them. I've yet to try acrylic again and I don't know how waterproof they ended up. But I figured even if they bled a little . . . it's tye-dye. Who's gonna notice?
In the end they looked pretty cool and the kid was quite happy with them. I've yet to try acrylic again and I don't know how waterproof they ended up. But I figured even if they bled a little . . . it's tye-dye. Who's gonna notice?
Right Outside Panel
General Lee
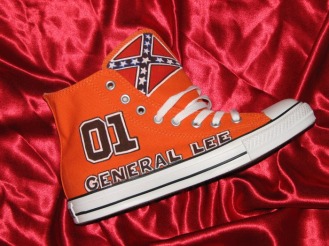
Outside Panel and Tongue
These are one of my faves simply for the cool story that goes along with them. The design themselves are relatively simple. It was all done in painty pen over a year ago. I've worn them a few times, but then, a couple of months back, I saw that John Schneider was going to be at a car show in Toronto. So off I dragged my wife to meet Bo Duke himself (it was our anniversary - not sure if she's forgiven me yet, though we also saw Dirty Dancing that night so I figure I paid my dues). He loved the shoes and I was so thrilled to meet one of my childhood heroes that I walked away without my autogrpahed pictures. I went back and we chatted for a while. It was very cool.
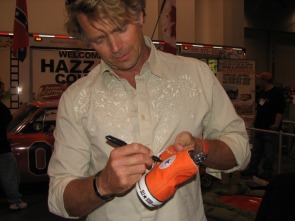
John Schneider signing the General Lee shoe

Me and John Schneider
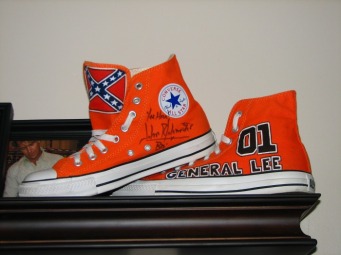
Aurographed Generals on display at home
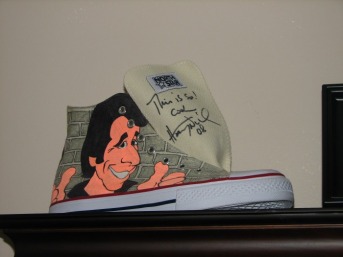
Henry Winkler Shoes
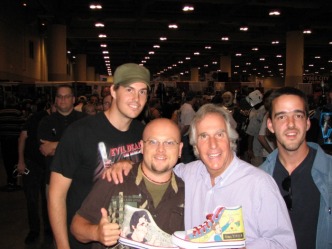
My buddy Ben, me, Henry Winkler, my buddy Ryan
This is another great story. Last summer (Aug. 08), Henry 'The Fonz' Winkler (another of my childhood heroes) was making an appearance at the Fan Expo in Toronto. He's also an author with a series of books featuring Hank Zipzer - a struggling kid who suffers from Dyslexia (as does Mr. Winkler). So I decided to make a pair of Henry Winkler shoes for him to sign.
We got in line and when we met, he was very cool. Seriously - The Fonz is as cool in real life as he was on TV. Anyway, I got him to sign the Fonzie shoe and I gave him the Hank Zipzer shoe. He seemed to be genuinely touched. So there's only one pair of Fonzie/Zipzer shoes on the entire planet. I have one of them and Henry Winkler has the other.
We got in line and when we met, he was very cool. Seriously - The Fonz is as cool in real life as he was on TV. Anyway, I got him to sign the Fonzie shoe and I gave him the Hank Zipzer shoe. He seemed to be genuinely touched. So there's only one pair of Fonzie/Zipzer shoes on the entire planet. I have one of them and Henry Winkler has the other.
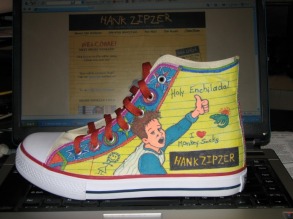
Hank Zipzer Outside Panel

Hank Zipzer Inside Panel (Fan Letter)
Autographed Fonzie Shoe
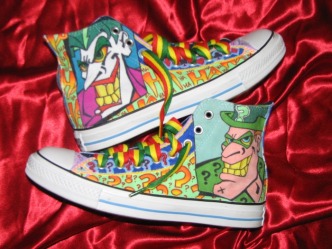
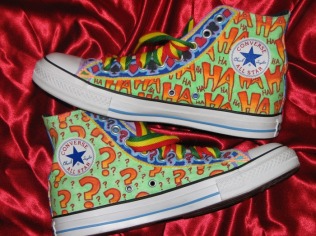
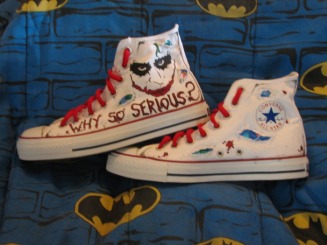
Why So Serious?
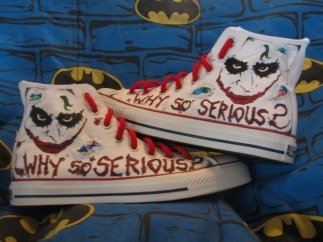
Outside Panels
These are my faves so far. I used a different kind of fabric paint here, though I can't recall what it's called. It's very vibrant and durable and brushes on with a screenprint-like finish.
I also used a seam splitter to tear sections out of the top layer of fabric and inserted some Jokeresque fabric in behind. I stitched it in place with white thread, added some red laces and viola - cool Joker shoes based on Heath Ledger's The Dark Knight protrayal.
I haven't had much opportunity to wear these yet, but I look forward to it. Right now they're too bright. They'll look awesome when they get dirty and worn.
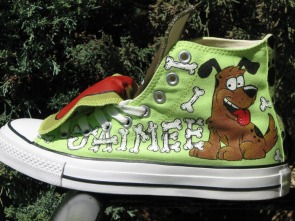
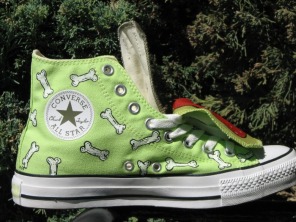
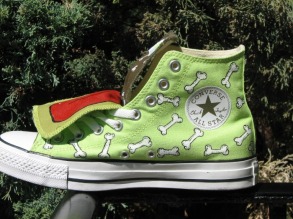
Dog Bones
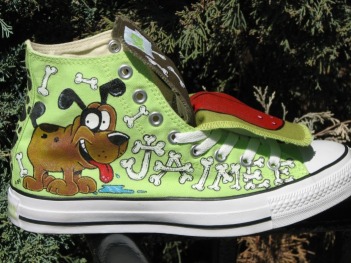
Outside Right Panel
These are the first pair of shoes I've done for a paying customer. I used the same fabric paint that I used for the Joker shoes to good effect, I think. It's pretty basic illustration and lettering, but it's very fun in its simplicity. I didn't realize that the shoes had a double tongue when I bought them and wasn't sure what to do with the second tongue (plus I was tired of painting bones) so I figured 'Hey, if it's a tongue, why not make them tongues. So that's what I did.
Outside Left Panel
Inside Left Panel
Inside Right Panel
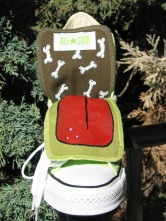
Double Tongue
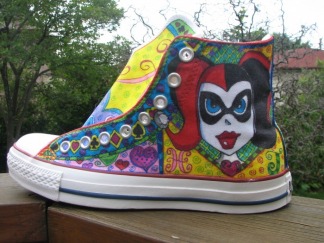
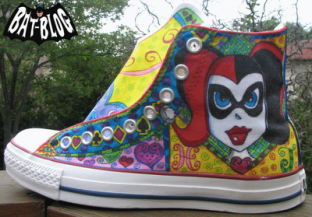
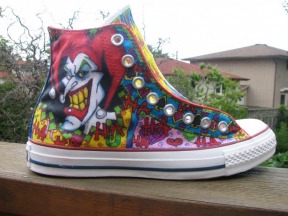
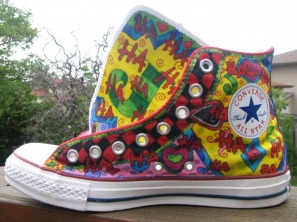
Joker and Harley Sittin' in a Tree . . .
Outside left Panel
These are perhaps the best, most detailed pair I have done to date. I'm very happy with the results and they're for a paying customer, which is always a nice, added bonus.
These Harley Quinn/Joker shoes took about ten or eleven hours in total to complete and were done entirely in Sharpies. Once finished they are given a light covering of weather-resistant coating to protect against water (Sharpies will bleed if they get wet - Which I learned the hard way).
So if you plan of trucking around Fan Exto 2009 this year in Toronto, keep your eyes on the floor, cuz these guys may just be hanging around Artists Alley.
Cost: $175
Outside Right Panel
Inside Right Panel
Inside Left Panel
Left and Right Tongues
Left and Right Heel Strips
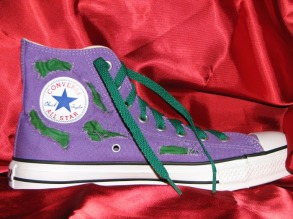
HULK SHOES SMASH!
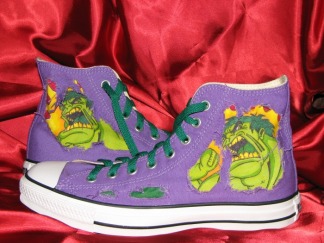
Left and Right Outide Design
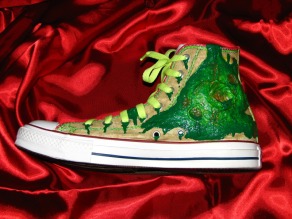
These are Hulk shoes that I have been planning for some time. This coming summer, Lou Ferrigno is coming to Fan Expo in Toronto and I hope to get these autogrpahed to go with my General Lees and Fonzie shoes.
It's a simple design. I took white canvas-like material and drew the Hulk design on in pencil. I then used Sharpies to colour it all in. After that I cut hunks of purple canvas away from the shoe, leaving the inner layer of white canvas exposed, and tucked the Hulk design inside the outer layer of fabric. After a quick stitch, the design was in place. Then I just cut more chunks of purple away and inserted green fabric and stitched them in place as well. Finally a quick fringe frizz on the cut away pieces and Voila! Torn up Hulk shoes. For a fairly simple design, I'm pretty satisfied with the overall results.
Price: $125
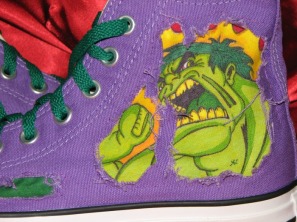
Left Outside Panel Detail
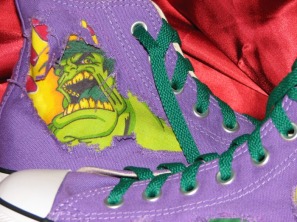
Right Shoe Outer Panel Detail
Inside Right Panel
Well, I managed to get the shoes to Lou Ferrigno (really it just meant waiting in line and handing them to him), but here he is autographing it. He thought it was kind of cool, as you can see in the pic to the right. Sadly, we didn't get a chance to pose with him. Too bad.
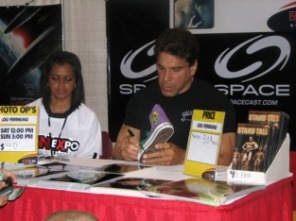
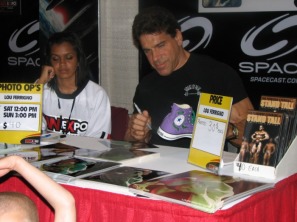
Lou 'The Incredible HUlk' Ferrigno admiring the shoe design
Good Day, Eh?

I found out just before Fan Expo that Dave 'Doug McKenzie' Thomas was going to make an appearance. On a whim I whipped up a Doug McKenzie shoe for him to hopefully sign. It's a cartoon of a beaver dressed like Doug McKenzie from SCTV's Great White North sketches and Strange Brew fame. The design isn't my favourite - it's a quickie, but Dave liked it and signed it for me.
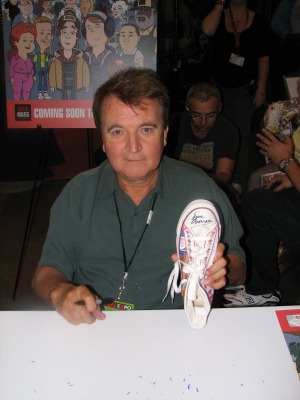
Dave Thomas proving that he signed the 'fake looking' autogrpah on the shoe
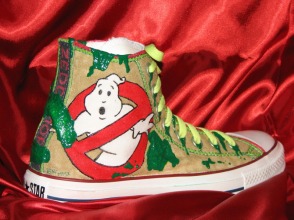
Whatcha Gonna Wear? GHOSTBUSTERS!
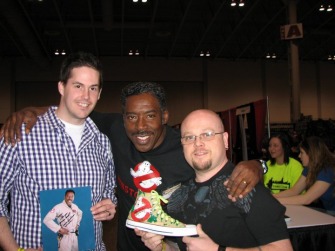
This is my first attempt at 3D shoe design. Here we have a Ghostbuster design especially for Ernie Hudson, who appeared recently at Wizard World Toronto. It depicts the Ghostbusters logo and ooey-gooey ectoplasm oozing from the eyelets and creeping around.
Ectoplasm detail
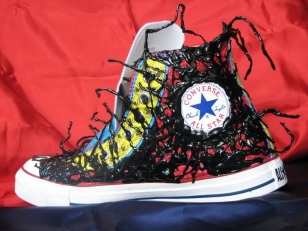
Spider-Man/Venom Shoe
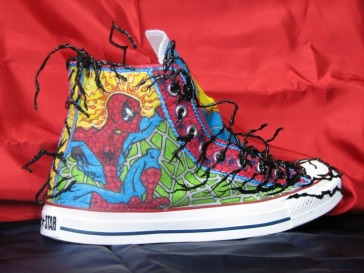
My second attempt at 3D design, the art on these Spidey shoes were done completely with Sharpies. They turned out quite well, though I do regret the green behind the webbing. Live and learn, I guess. The black stuff is Venom, the alien symbiot that is apparently trying to make its way around to Web Head.
Venom was made using gobs and gobs of 3D fabric paint and pieces of straightened out paper clips, also covered in gobs and gobs of fabric paint.
Stan 'The Man' Lee, creator of Spider-Man (among virtually every other keystone Marvel comics character) will be at Fan Expo this summer and I hope to get them signed by him.
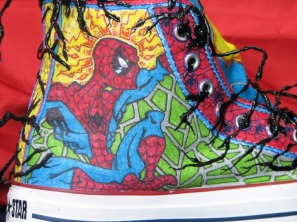
Spidey art detail
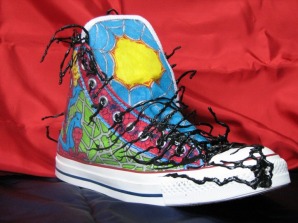
Tongue and Venom 'laces'. I left the yellow space for Stan Lee's autograph
Venom is oozing his way around
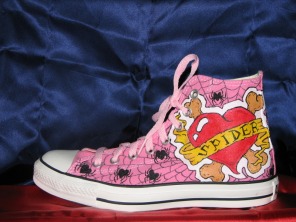
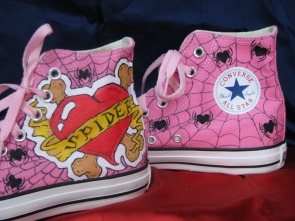
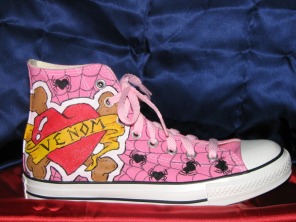
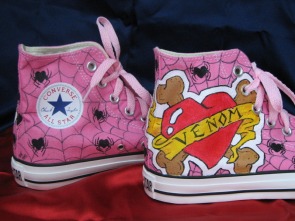
Spider Venom Grad Shoes
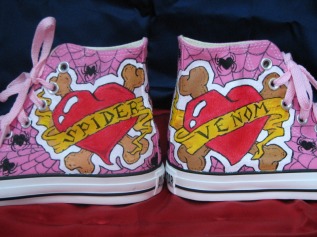
I made this pair for a young lady graduating from Grade 8. She is wearing an elegant pink gown and wanted a pair of custom Converse to compliment them. Her nick-name (for reasons beyond my comprehension) is Spider Venom, which she wanted on the shoes. This is the design I came up with. The heart, banner, and cross bones are done with fabric paint and the webbing and heart spiders are done simply with black Sharpies. She loved them, by the way and has worn them almost every day since she got them, unable to keep them until grad. Good for her.
Right shoe outside panel
Left shoe outside panel
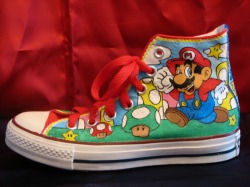
Mario and Bowser
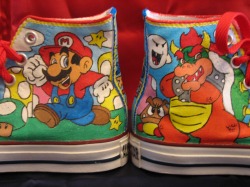
These Mario/Bowser shoes were commissioned as a birthday gift for an eight year old boy. I used fabric paint for the entire design. They were a bit of a rush job and probably not my best work, but he liked them quite a bit.
Left Outside Panel

Left shoe inside panel

Right Outside Panel
Right shoe inside panel
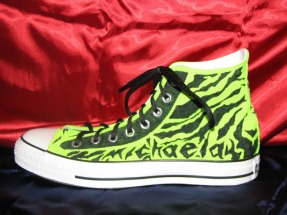
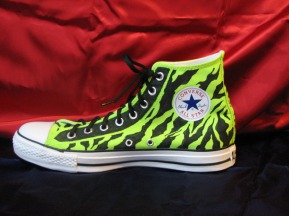
Zebra Print
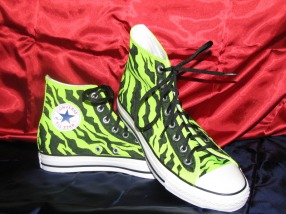
This Zebra print design was commissioned by yet another paying customer (I like how they do that). The request was pretty basic - a zebra stripe design with the person's name incorporated into the design. This is what I came up with.
The hardest part, actually, was finding the right coloured shoe in the right size. I spent the better part of the day driving around Buffalo and Niagara Falls NY to find them. But I finally managed to get what I needed and the shoes were completed over two nights - a total of about 6 hours.
The hardest part, actually, was finding the right coloured shoe in the right size. I spent the better part of the day driving around Buffalo and Niagara Falls NY to find them. But I finally managed to get what I needed and the shoes were completed over two nights - a total of about 6 hours.
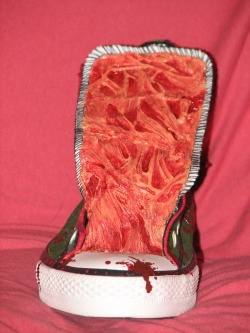
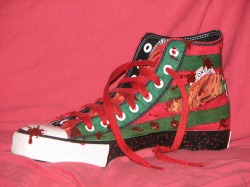
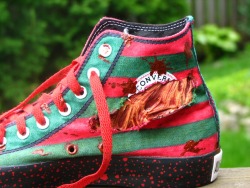
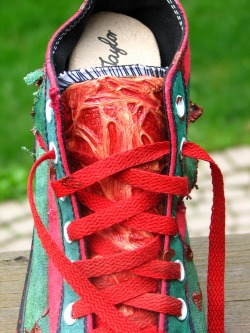
One. Two. Freddy's Coming for Shoe...
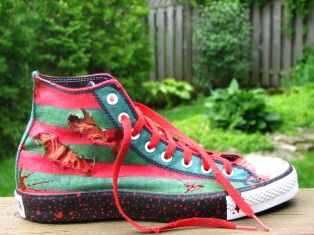
This summer at Fan Expo, Heather Langancamp of Nightmare on Elm Street fame will make an appearance. I made this Freddy shoe in the hopes that she will sign it.
This was a plain white shoe with the black and red spatter wall pattern. I used Sharpies to make the stripes, hacked out slashes of fabric a la Freddy, and then used one of my son's Venom figures to make the flesh. I did this by making a negative mold of the Venom goop using modeling clay and then poured liquid latex onto the mold. Twelve hours later and three layers of paint and you have latex Freddy flesh.
This was a plain white shoe with the black and red spatter wall pattern. I used Sharpies to make the stripes, hacked out slashes of fabric a la Freddy, and then used one of my son's Venom figures to make the flesh. I did this by making a negative mold of the Venom goop using modeling clay and then poured liquid latex onto the mold. Twelve hours later and three layers of paint and you have latex Freddy flesh.